If a WordPress user is not familiar with the “the link you followed has expired” issue, he will get panic after counter with this error, because it doesn’t reveal anything about the subject.
It happens when you try to upload any unique theme or plugin and reserves you not to trying anything new.
WordPress has imposed some restrictions on changes you can make to your website, to maintain your website’s performance.
So if you have ever encountered this problem, I am going to elaborate on how you can resolve the “the link you followed has expired” issue.
What Causes “The Link You Followed Has Expired” Error?
The reason for this error is the limit of the file size you upload on your website. WordPress and your hosting company have set some restrictions about the maximum file size you can upload to your website.
In most cases, it has been set to a maximum of 40 MB; whenever you try to upload a larger file of more than 40 MB, it will generate this error. Some hosting companies have set maximum limitations of 100 MB.
When you upload a large file, it will get uploaded, but it will take ample time to execute it; that’s why you will get to see this error.
Before You Start, Make a Backup
Backup is as important as making changes to the website’s database and core files when you face any error. Especially when you are resolving an RSS feed error or the link you have followed has expired which needs internal file configurations.
Because when you make changes to the database, sometimes, if something doesn’t work in your favor, and you lost anything, backup is always here to save you.
If you have a recent backup before making changes to the website and anything wrong happens to you, it is easy to recover with backup.
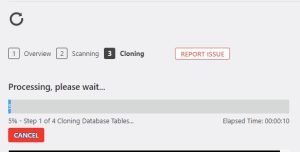
Rather than make a manual backup, I recommend you a plugin like WP Staging to make a clone or backup of your website. WP Staging is easy to use; with a few clicks, you can backup your whole website.
First, you need to install the WP Staging plugin’s pro version. (If you have not purchased it, the version you will install will be a free version. You have to buy the Pro version of WP Staging.
- For that, Go to Plugins> Add new
- Search for WP Staging, and Install it.
- Now activate it, you will see a new WP Staging section in the left menu panel.
- Click on Get WP Staging Pro; You will see an option of Buy WP Staging Pro on the right; click on it.
- The official website of the WP Staging will open. Please choose a plan which suits you and purchase it by entering your credit card information).
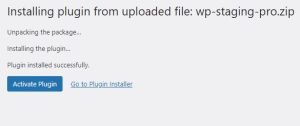
- Go to plugins, Click on Add plugin. Here you will see the Upload Plugin option on the upper left corner. Click on it and upload Purchased WP Staging (I assume you have purchased WP Staging).
- Now Activate the Plugin.
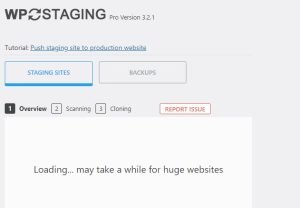
Note: Only the pro version of WP Staging supports backup and restoration. After installation, Go to WP Staging Pro in the left pane.
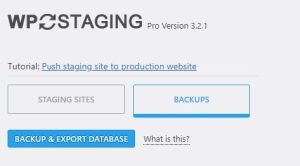
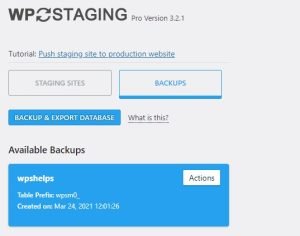
- Click on Site/Start, Now the new window will appear, and you see two options of Staging Sites and Backups.
- Click on Backups; an option of Backup and Export Database will appear; click on this option to start making a backup of your website.
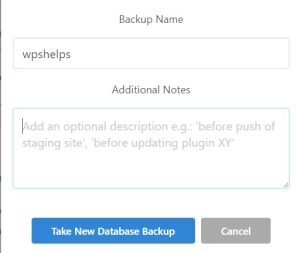
- Name the backup file; click on Take New Database backup.
- Wait until your copy of the database is ready to download.
- After finishing, you can download a backup of your website locally.
- Now in WP Staging Pro, In the Backup option, you can see your website’s backup in the Available Backups option.
Whenever you want to restore your website’s backup, you need to click on Actions and then click the Restore option. With a few clicks, you can easily make a backup of your website and restore it from the backup whenever you want.
Methods To Resolve “The Link You Followed Has Expired” Error?
You can resolve this issue by making essential changes to the core files of WordPress. To use this method, you should have basic technical knowledge. You use this method, and if this doesn’t work, try the other one.
Edit functions.php
Funtions.php is the core file of the theme; it has all the basic settings regarding the theme. You can add code to increase the size of the upload file via functions.php.
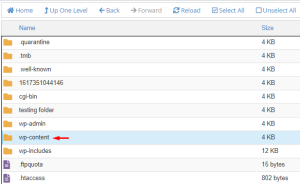
- Login to CPanel> File manager.
- In the root directory, go to wp-content>themes.
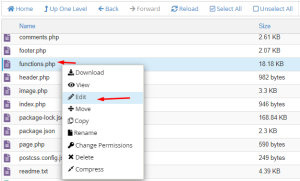
- Look for functions.php, edit this file.
- Please add below code to the function.php file.
@ini_set( ‘upload_max_size’ , ‘100M’ );
@ini_set( ‘post_max_size’, ‘100M’);
@ini_set( ‘max_execution_time’, ‘280’ );
- Now save the changes.
Note: You have to make this change every time you change your theme.
Edit .htaccess file
This .htaccess file is the core file of WordPress. This time you have to change this file to increase the upload limit on your website.
- Login to CPanel.
- Go to the file manager.
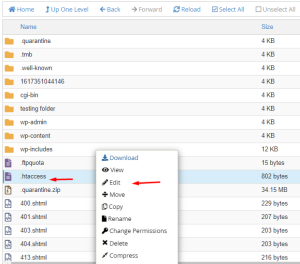
- In the root directory there will be .htaccess file, edit it.
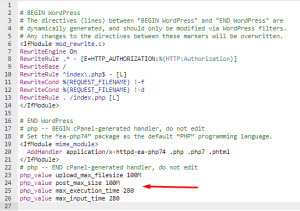
- In the end of this file paste this code.
php_value upload_max_filesize 100M
php_value post_max_size 100M
php_value max_execution_time 280
php_value max_input_time 280
- Now save this file and login to your dashboard, and check the links that were not working before.
Create a new file PHP.ini
It is the last method I are going to explain, which can resolve this issue. Sometimes you don’t have access to the .htaccess file because it is an important file that can make or break a website. Hosting plans block these files from being accessed by anyone.
In that case, if you don’t find the .htaccess file, you can still change the upload size for your website by creating a file by yourself.
- Login to CPanel.
- Go to the file manager.
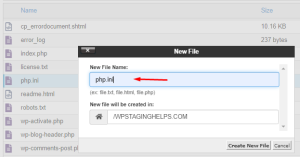
- In the main root folder, create a new file.
- Name this file as PHP.ini.
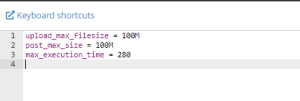
Open PHP.ini and add the following code.
upload_max_filesize = 100M
post_max_size = 100M
max_execution_time = 280
Ending Thoughts
Website security is the essential concern of the website owner. So different CMS and hosting companies use different strategies to reduce the chances of any security breach. Limiting the file upload size is one of them.
So hackers can’t upload big malicious files to your website and slow your system. Limiting the upload size also helps to increase the performance of the website.
When you upload a file larger than your defined limit, your website shows an ‘the link you followed has expired” error.
If you want to remove this error and increase the upload size on your website; you can do that by following our guide. I have explained each method that will help you to get rid of this issue.


