Installing a plugin in your WordPress website for your convenience is not always going as well as we thought; rather than providing easiness, it could cause a problem for our website due to compatibility issues or sometimes due to an error in the plugin.
Changing the plugin is easy if you have access to the dashboard, but sometimes due to a mistake created by the plugin, you lose access to the dashboard. You have to disable the database’s plugins, but most people don’t know how to disable a WordPress plugin from the database.
There are more methods than a database to disable plugins, and we will explain each technique, so if you are stuck in this kind of problem, you can try each method if one method didn’t work.
Backup with WP Staging before Make Any Change:
Backup is as important as making changes to the web site’s database and core files. While making changes to the database, sometimes, if something doesn’t work in your favor, and you lost anything, backup is always here to save you. If you have a recent backup before making changes to the website and anything wrong happens to you, it is easy to recover with backup.
Rather than make a manual backup, We recommend you a plugin like WP Staging to make a clone or backup of your website. WP Staging is easy to use; with a few clicks, you can back up your whole website.
First, you need to install the WP Staging plugin’s pro version. (If you have not purchased it, the version you will install will be a free version. You have to buy the Pro version of WP Staging.
- For that, Go to Plugins> Add new
- Search for WP Staging, and Install it.
- Now activate it, you will see a new WP Staging section in the left menu panel.
- Click on Get WP Staging Pro; You will see an option of Buy WP Staging Pro on the right; click on it.
The official website of the WP Staging will open. Please choose a plan which suits you and purchase it by entering your credit card information).
- Go to plugins, Click on Add plugin. Here you will see the Upload Plugin option in the upper left corner. Click on it and upload Purchased WP Staging (We assume you have purchased WP Staging).
- Now Activate the Plugin.
Note: Only the pro version of WP Staging supports backup and restoration.
- After installation, Go to WP Staging Pro in the left pane.
- Click on Site/Start, Now the new window will appear, and you see two options of Staging Sites and Backups.
- Click on Backups; an option of Backup and Export Database will appear; click on this option to start making a backup of your website.
- Name the backup file; click on Take New Database backup.
- Wait until your copy of the database is ready to download.
- After finishing, you can download a backup of your website locally.
Now in WP Staging Pro, In the Backup option, you can see your website’s backup in the Available Backups option. Whenever you want to restore your website’s backup, you need to click on Actions and then click the Restore option. With a few clicks, you can easily make a backup of your website and restore it from the backup whenever you want.
Why do you need to access your plugins Through Different ways
If you ever face a plugin and want to deactivate that plugin but cannot do it via the dashboard. Then you have to know different ways to access plugin settings and make changes to resolve the problem.
Sometimes one method is not enough to know, and you don’t know which method will work for you; that is why it is necessary you know multiple ways to do that.
How To Disable a WordPress Plugin From The Database
- Login to CPanel.
- Click on PhpMyAdmin, under the database section.
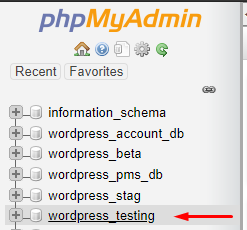
- Now you have to select your database from the left pane.
- Now look for the options table, mostly it is available in the database as wp_options.
- (Prefix may change like wpm or wpg1)
- Click on the options table.
- It will list down multiple options regarding your website.
- Under the option name column, look for active plugins entry.
- Once you find it, click on the edit button corresponding to active plugins.
- On the edit interface, assign a new value “a:0:{}”, now Click Go.
Congratulations! Your plugins have been disabled.
Disable Plugin Via WP-admin Dashboard
To deactivate the plugin from the WordPress dashboard.
- Log in to the WordPress website.
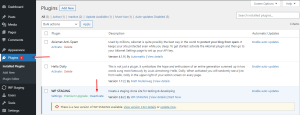
- On the main dashboard, you will see the Plugins option; Click on it.
- You have a list of the plugins you have installed.
- Beneath every plugin, you can see an option to deactivate the plugin.
- Click on deactivate to any plugin you want to disable.
- If you want to delete the plugin, you can also click on the Delete button.
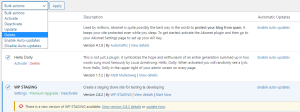
- You can disable multiple plugins at once as well. Mark check on the plugins you want to deactivate.
- Go to the upper navigation bar click on bulk action.
- A dropdown list will popup, select deactivate option and click on apply.
You can delete multiple plugins in the same manner.
How to Deactivate a WordPress Plugin Manually Via FTP
You can disable any plugin from FTP; the process is also simple. But only do it if you lost access to the dashboard of the WordPress website. You have to connect to your website manually via FTP to deactivate the plugin.
- First, connect to your website via FTP.
- It would help if you had FTP credentials to do this, or you can do it by login into the CPanel of your website and going into the file manager.
- If you connect to your website via FTP or CPanel’s file manager, you must follow the same steps.
- Navigate to the folder of your website.
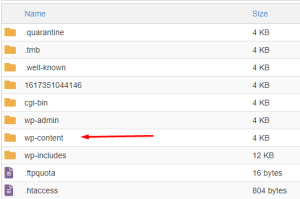
- Navigate to the wp-content folder.
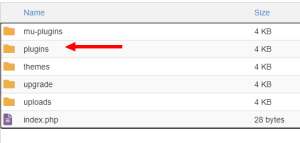
- In the wp-content folder, you will find the folder named plugins.
- In the plugins folder, all your installed plugins reside.
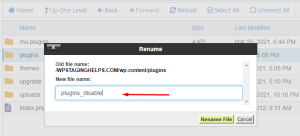
- Now rename the whole plugin folder as plugins_disable, If you want to disable all plugins.
- But if you want to disable a specific plugin, Go to the plugin folder and select the plugin you wish to disable.
- Please right-click on the particular plugin and rename it to yourpluginname_disable.
- Now go back and log in to the WordPress dashboard.
Via SQL Query
To disable plugins with SQL queries, you have to follow the following steps.
- Login to the CPanel
- Click on PhpMyAdmin, which is a database management tool.
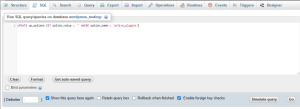
- Select your database, and in the navigation bar, click on the SQL tab.
- In the SQL query panel, type the following query.
- “UPDATE wp_options SET option_value = ” WHERE option_name = ‘active_plugins’;”
- Note: prefix of your database tables could change, so you have to put your tables prefix before _options.
- This query will disable the active plugins without uninstalling or modifying them.
Via WP-CLI
We can disable WordPress plugins from our website with the help of a command-line as well. WP- CLI is a command-line tool to manage WordPress.
You have to run the following commands to disable the plugins.
But before doing it, it is necessary to know the exact name of the plugin with which it is saved in the repository of WordPress. For example, https://wordpress.org/plugins/contact-form7/ “contact-form-7” is the same name as the plugin.
- The user can use the following command to see the list of current plugins installed on your website.
- “wp plugin list.”
- Now to deactivate the plugin, use the following command wp plugin deactivate contact-form-7 Suppose you want to deactivate all the plugins at once.
- Use the following command in WP-CLI.
- “wp plugin deactivate –all”
That all; WP-CLI is not too technical to manage. You need to remember the commands. It is an easy way to deactivate the plugins.
Conclusion
We have described a thorough guide to you. If any plugin causes an error to your website or WordPress dashboard. You can use any method to deactivate plugins from your WordPress database.
If you have technical knowledge, it doesn’t matter; we have explained all the ways to the point. So if you follow the described steps, we hope you can successfully perform the task.

